How to make HTML5 Web Apps that interact with
Index
HTML5 - What it is
For more help with HTML5’s features, see: Codecademy
iSENSE overview
PhoneGap - HTML5, but in a Mobile App
For more help with PhoneGap, see the documentation here .
Interacting with iSENSE
HTML5 - WHAT IS IT?
HTML5 is a group of web technologies, consisting of HTML, CSS and JavaScript. HTML5 is the 5 th version of HTML, a markup language which originated when the Internet was first created. HTML5 is used to create Internet web apps, web games and web pages.
HTML consists of the following web technologies:
HTML - Hyper Text Markup Language. This is the main document of an HTML5 web page/app/etc. It is what makes web sites possible, as web browsers are able to take an HTML document and turn it into a viewable website. The HTML document defines what images, objects, links, and so forth will appear on the screen. The document also refers to CSS and JavaScript files for certain things, which will be explained next.
CSS - Cascading Style Sheets. CSS files define what the web page should look like - what its style should be. This includes the colors of the text, background, the size of images, text, and objects and also the general positioning of anything on the web page. Objects can be centered, moved to the left or right margin or moved to certain coordinates on the screen. The HTML document can also do some of these things using <style> tags, but it is highly recommended to have all the style properties of a document in a separate CSS file.
JavaScript - JavaScript is a dynamic programming language, used to make web sites interactive. JavaScript can change the HTML document at various times - on page load, it can make a map appear or if another site fails to load it can print an error to the document. JavaScript can also interact with a web user, by detecting when a button on the screen is pressed or when any part of the screen is clicked on. JavaScript is the key to making an interactive web page.
“ Hello World” HTML5 Page
The best way to learn HTML5 is to dive right into it. Here's an example of a Hello, World! HTML5 Web Page. I suggest copying and pasting this code into a new document, giving it a name (“Hello”) and a .html file extension. That is, you should name this new document “hello.html”. The .html is how computers and web browsers identify HTML files from other files.
NOTE: You make need to right click the file and open it with a text editor to change it/view your code. Simply clicking on a file with a .html extension will probably load that file on a web browser.
Take a look at this file, and make some changes to it. Play around with it - see what breaks it, try some things if you know any HTML and if not continue on to the next section!
<!DOCTYPE html>
<html>
<head>
<meta charset="UTF-8">
<title>Hello, World</title>
</head>
<body>
<h1>Hello, World!<h1>
<p>Hello again!</p>
</body>
</html>
HTML5 - More Information
Let's take another look at the “Hello, World” web page:
<!-- This is how to make a comment in HTML. -->
<!-- DOCTYPE defines the document as an html file type. -->
<!DOCTYPE html>
<!-- These are called TAGS. Tags typically look like this:
<tag>SOMETHING IN BETWEEN</tag>
The “in between” is usually text - text that can be formatted differently, or linked to another page.-->
<html>
<!-- The head is where the title, scripts and the charset attribute goes -->
<head>
<!-- The charset attribute tells the web browser what character encoding the document uses. -->
<meta charset="UTF-8">
<!-- The title changes what the title in the tab shows -->
<title>Hello, World</title>
</head>
<body>
<!-- <h1> and <p> are tags which change how the text looks.
Notice how <h1> is larger than <p> ? -->
<h1>Hello, World!<h1>
<p>Hello again!</p>
</body> <!-- These are called ending tags. -->
</html> <!-- Always include the ending tag if the type of tag you are using requires it. -->
Try putting this version into another document. Notice how the comments do not appear when the document is displayed in a browser? Those familar with other programming languages will reconize this. Comments are very useful for marking what parts of a document/function/etc do. For example, say I have the following:
<script>
var letter = document.getElementById("table_val").value;
var temp = formData[0];
var ph = formData[1];
var dox = formData[2];
var phos = formData[3];
$.post(API_URL, upload);
</script>
Do you have any idea what this script does? Now if I include some comments:
<!-- This script processes the user's input and submits it to the iSENSE website -->
<script>
// These variables all will contain information from the HTML document
var letter = document.getElementById("table_val").value;
var temp = formData[0];
var ph = formData[1];
var dox = formData[2];
var phos = formData[3];
// This command submits the data to iSENSE
$.post(API_URL, upload);
</script>
See how you now have somewhat of an understanding of the above code? That's the point of comments - to let other people who may look at your code know what you were thinking. Or even to remind yourself of what certain parts of program do, in case you go back to an older project after a few months.
NOTE: notice how in the script tags the comments were different? Those are JavaScript comments. We'll talk about those later on. For now, just note they do the same thing as HTML comments - they hide whatever is between them/on that line.
More Information
The scope of this tutorial is mainly for using and interacting with the iSENSE website. As a result, if you do not fully understand HTML5 or any part of it (HTML, CSS or JavaScript) I highly recommend checking out the codecademy website. They have tutorials on many popular programming languages, and glossaries outlining the various parts of each language. Signing up is free, and is extremely easy if you have a Facebook or Google account.
Programming Languages codecademy has:
HTML & CSS
Javascript
jQuery (extremely useful!)
Python
Ruby
PHP
APIs
Click here for the codecademy website: http://www.codecademy.com/
I would suggest going through the following:
HTML & CSS - for using HTML5
JavaScript - this is also for HTML5 and it is the main way you send data/get data from iSENSE
jQuery - useful as it is a JavaScript library and can make your life easier.
APIs - there are other APIs, such as Twitter, Youtube, Google Maps, etc that can be useful to look at if you get stuck, or cannot seem to get something working. Also Google Maps can be very useful with iSENSE for dynamically making maps / showing a location on a map / etc.
Overview
One of the best ways to learn about something to just explore it on your own. I suggest doing so now, by going to isenseproject.org and taking a look at iSENSE.
...
The iSENSE project is a web system for collecting, sharing and visualizing scientific data. The web site is built to be used by middle school and high school students and teachers. Science and math classes benefit the most from iSENSE, as the site is data oriented, and these classes use data often in experiments and in homework examples.
The data on iSENSE is stored in projects and datasets. A project is a collection of datasets, and datasets are collections of data, such as numbers, text, pictures, and so on. Datasets themselves are classified by fields, which define what types of data are submitted to a project. Fields can be anything from timestamps, numbers and text to GPS coordinates such as latitude and longitude.
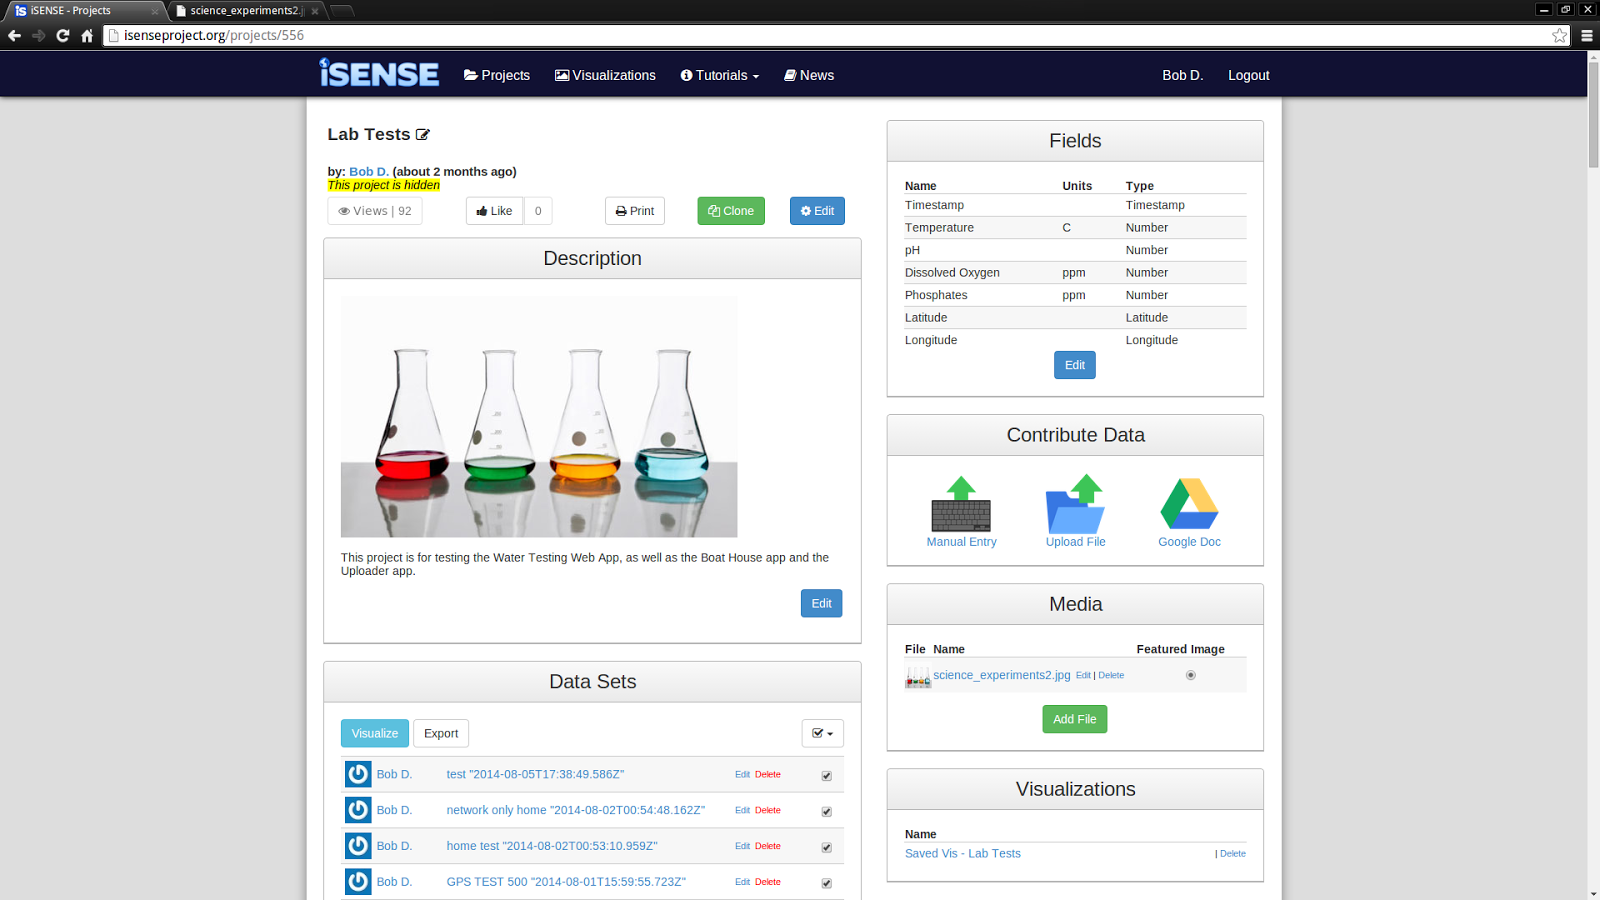
Here is an example of a project:
Here is an overview of the iSENSE web page:
“Projects” shows all the current projects on iSENSE. Projects are viewable by anyone, including people not logged in. Only people logged in or who have a contributor key may add to a project. The “Projects” page is also where you should go to make a new project - just log in, and then click the big green “create project” button.
“Visualizations” shows all the saved visualizations that people have saved. Visualizations are ways of viewing the data on iSENSE. Currently there are the following types of visuals:
Map - A Google Map of all the locations in the project or of all the datasets you have selected.
Timeline - Data graphed over time. This vis shows the changes to the dataset(s) over the time period detected, possibly minutes, hours, days, weeks, etc.
Scatter - Plots of two sets of data on a grid. The value of each data point determines the x and y coordinates. Ex: Windspeed on the Y, Temperature on the X, would create a graph with windspeed determining the Y coordinate and Temperature determining the X coordinate.
Bar - One or more bars which represent various properties of the data - currently supported is mean, median, minimum, maximum, row count and total.
Histogram - Similar to bar, except histogram uses bins to display the frequency of the data.
Table - Large summary of all the data being visualized. Shows all the data in rows and columns.
Summary - Page which displays a summary of all the data being visualized. Mean, Median, Maximum, Minimum, Total and Data Point Count.
Photos - Shows all the photos in the project.
“Tutorials” are helpful guides to how to do different things on iSENSE. Similar to this page!
iSENSE is an open source project, and all of the source code for the site is hosted on GitHub under the “isenseDev” repository.
HOW TO USE PHONEGAP
STEP 1. PREREQUISITES - INSTALL & UPDATE
To use PhoneGap on Linux you will require the following prerequisites:
Node.js
See: http://nodejs.org/
Which requires:
* GCC 4.2 or newer
* Python 2.6 or 2.7
* GNU Make 3.81 or newer
Use the command: gcc -v for the GCC version.
Use the command: python --version for the Python version
Use the command: apt-cache show make for the make version
uname -a will give you your Linux version
Also apt-cache show <package name> can also show version numbers and other information.
For the purpose of this tutorial, I am running Ubuntu 14.04. If you are running another version of Linux, you may need to look up a guide for that version.
Windows and Mac users should see this page for more information.
Also, if you are using a recent version of Linux which has been updated recently, you shouldn’t need to worry about GCC or GNU Make. You may need to update Python. Use this command if you need to do so:
$ sudo apt-get install python
Note: for the purpose of this tutorial, “command” refers to the terminal and anytime you see
$ command
it means go to the terminal and follow the steps listed.
Now download node.js for your platform.
Follow this example for Linux. Will make your life super easy.
For Windows, you should just need to download the installer from here.
From the askubuntu forums:
(replace “program-1.2.3” with node.js)
"The first thing you need to do is extracting it in a folder, let's make it your desktop. You can extract an archive right clicking on it and choosing the appropriate entry. It should create a new folder with a similar name, e.g. program-1.2.3. Now you need to open your terminal and then go to that directory:
$ cd /home/yourusername/Desktop/program-1.2.3
Make sure you first read a file called INSTALL or INSTALL.txt or README. Check if there is any of these files with the ls command, and then display the right one with:
$ xdg-open INSTALL
The file will contain the right indications to go on with the compiling process. Usually the three "classical" steps are:
$ ./configure
$ make
$ sudo make install
HELLO
You may also need to install some dependencies, generally after some configure error which will tell you what you are missing. You can also use checkinstall instead of make install. See here https://help.ubuntu.com/community/CheckInstall
Remember that your mileage may vary."
Now you have Node.js. Now for PhoneGap!
STEP 2. INSTALL PHONEGAP
Run this command:
$ sudo npm install -g phonegap
And see if you get any errors. You will probably get errors. See the next 3 sections for information on errors.
Step 3. BUT WAIT THERE'S MORE!
You also need to install ANT! If on Linux do this:
sudo apt-get install ant
(Failing to do this may result in Error Code 8)
You will also need to setup the path for your Android SDK.
IF YOU DON'T HAVE THAT AS WELL, GO HERE.
Similar install to node.js.
NOTE: YOU MIGHT GET ERROR CODE 2 IF YOUR SDK PATH IS DIFFERENT OR NOT SET UP CORRECTLY…
Error code 2 requires you to add the following to your .bashrc:
To edit your bashrc, type the following into a terminal:
$ cd ~/
$ sudo gedit bashrc
Add the following lines:
#AndroidDev PATH
export PATH=${PATH}: /home/jason/Development/adt_bundle/sdk/tools/
export PATH=${PATH}: /home/jason/Development/adt_bundle/sdk/platform-tools/
(Change the path (the blue portion) to reflect where you installed the SDK to. Google recommends this location be in your home directory, in a folder called “development”. Your home folder is the “ /home/*USERNAME*/ ” folder)
Now make a directory called "PhoneGap". This is where all your PhoneGap projects will be stored. I suggest making it within a development folder, perhaps next to the AndroidSDK folder you created above.
Now cd into the PhoneGap folder and try the following commands to test the Android build:
phonegap create helloworld
cd helloworld
phonegap build android
You may also get errors at this point. Proceed to Step 4 & 5 for help with them.
Step 4. ERROR CODES ERROR CODES EVERYWHERE
- YOU MIGHT GET ERROR CODE 1. The following is what I saw:
Unable to locate tools.jar. Expected to find it in /usr/lib/jvm/java-7-openjdk-amd64/lib/tools.jar
Buildfile: /home/jason/Coding/ECG/PhoneGap/shitballs/platforms/android/build.xml
Looks like we also need to install “openjdk-7-jdk”.
Run the following command:
sudo apt-get install openjdk-7-jdk
See this thread for more info if this error code bothers you.
Note: this is similar to the Android SDK errors.
These are the commands you need to use:
$ export JAVA_HOME=/usr/lib/jvm/java-7-openjdk-amd64
$ export PATH=$PATH:/usr/lib/jvm/java-7-openjdk-amd64/bin
Step 5. TESTING YOUR PHONEGAP ENVIRONMENT
Now you should have a somewhat functioning PhoneGap environment! Woo hoo!
Try running the following command with a device plugged in to see if you can actually deploy to Android:
$ phonegap run android
If you get any errors, you may need to restart your PC. OR see the following.
- You might get this error after trying to install an app to a device:
ERROR: Failed to launch application on device: ERROR: Failed to install apk to device: pkg: /data/local/tmp/HelloWorld-debug-unaligned.apk
Failure [INSTALL_PARSE_FAILED_INCONSISTENT_CERTIFICATES]
This will apparently happen if you try to use the default PhoneGap build on the same device (tablet/phone/etc) but with two different computers.
See this page for a description of the problem.
See the following page for more information if this issue affects you.
Follow the following steps if the above certificate issue affects you.
First open the command line, navigate to your phonegap directory and type the following commands:
$ cordova create hello com.example.hello HelloWorld
$ cd hello
$ cordova platform add android
$ cordova build
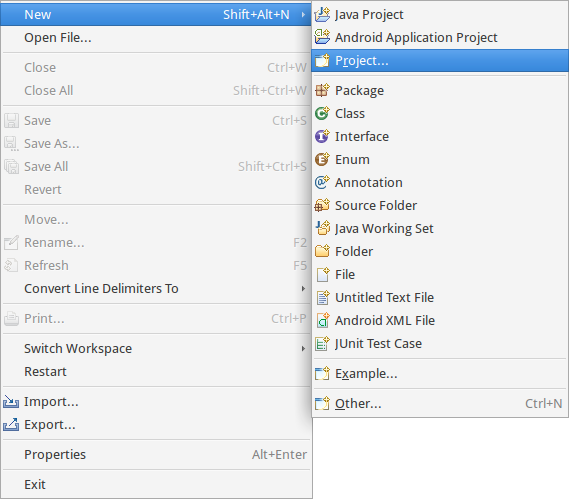
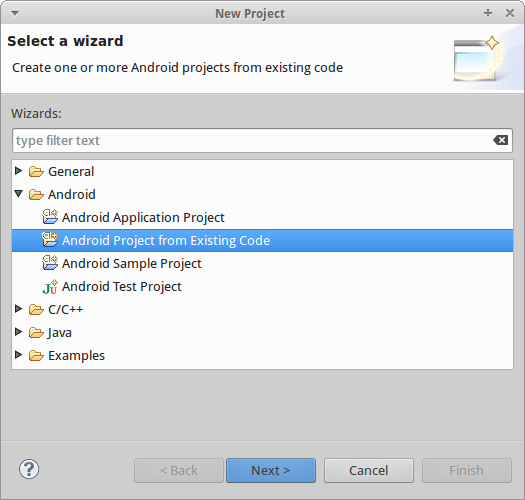
Now open the Android SDK, and do the following steps:
Now you will want to “clean” the project. Do the following:
Note, if you are using a newer Android device, you may need to follow the below steps for getting your device working with ADB (Android Debug Bridge). I tried an LG G3 and had to do this. Yet several Nexus 7’s that we have did not require this.
(From the XDA Developer Forums)
“This much is true for almost any Android device:
REQUIREMENTS: You must have root access to your linux box.
1. Unplug your phone from the computer
2. Make yourself a "developer" on your phone. Settings > General > About phone > Software information ... then tap "Build number" a bunch of times until it says "You are now a developer" or something like that.
3. Go into the developer settings ... Settings > General > Developer options
4. Check "USB Debugging"
5. Plug the phone in to your computer
6. Drop down the notifications menu and click on the item that has the subtitle "Tap for more USB options". Most likely, the main title will say "Media Device (MTP)". Anyway - click on that.
7. Then choose the option "Send Images (PTP)"
8. Tap your way back Home and then eject and unplug the phone from your computer again.”
IF YOU HAVE AN LG G3, follow the next few steps on that page.
Step 6. WHAT CAN I DO WITH THIS?
You now have PhoneGap installed on your Linux box. Congratz! It only took half a day and a ton of frustration! What can you do with it now?
Replace the index.html with your own HTML file.
In the CSS and JS folders, replace the index.css and the index.js files with your own css and js files.
Make sure to keep them named index.file extension!
You can pretty much do anything you want with the HTML, CSS and JS. Anything a normal website can display, PhoneGap is able to do. And PhoneGap can even run its apps on Android, iOS, Windows phone and BlackBerry - with no extra coding required.
There are various PhoneGap APIs you can use as well, such as:
accelerometer
camera
GPS
sensors
etc.
For more help with PhoneGap, please see the PhoneGap documentation here.
Interacting with
Index
1. Posting to an iSENSE Project
2. Getting info from an iSENSE Project
Currently commenting all my code to make it so anyone can just look at the source code and have some idea of how to upload/get data to/from iSENSE.
Done so far:
To do: